If you are a new drone pilot and user of the DJI Go 4 app, then getting to grips with both camera controls and flight controls can be challenging. I hope to share some tips and provide an overview of the settings for getting great photographs from the DJI Mavic 2 drone right from the start.
Becoming proficient with flight controls alongside camera controls was straight forward for me, with 20 years plus experience as a commercial photographer I could apply the lessons learnt in this time to drone photography which largely rely on the same basic principles found in most photography disciplines and some of the same camera settings. Getting to know the drone flight controls and capability took some time to practice even with all the automated technology that DJI build into the flight controls.
Without going into too much depth and technical detail here is a breakdown of all the settings on the DJI Go 4 app and some tips related to photography technique.
- DJI Mavic Photography Camera Menu Settings
- Exposure and Manual Exposure
- Wind Speed
- Best Light – Best Time of day
- Composition
- Noise Stacking
- Plan, Pre Visualise And Scout Location Online
1) DJI MAVIC PHOTOGRAPHY CAMERA MENU SETTINGS
Set up camera settings before take off including the approximate exposure. This will save time in the air. Deciding ahead of the flight what your goal is and how best to capture it, will determine the appropriate settings. There are three tabs for the Photography Camera Settings. Exposure / Photo / Camera.
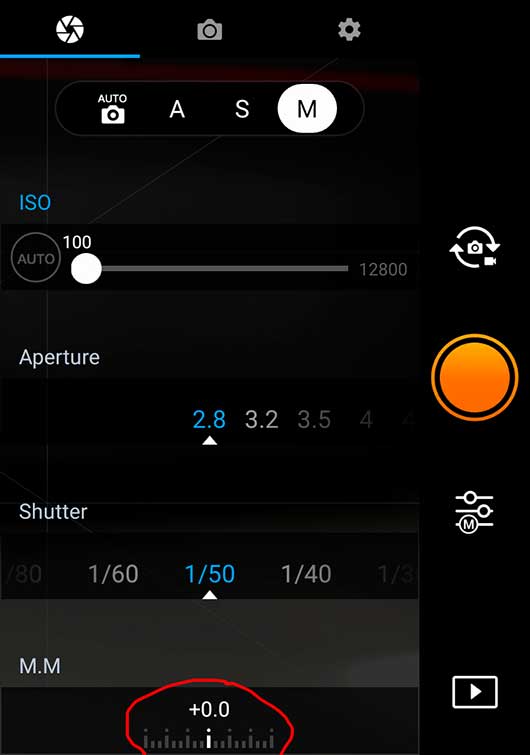
EXPOSURE SETTINGS
- Auto / Manual – Manual is best fore more control over the final look and for obtaining a better exposure.
- ISO -iso100 is best if possible as noise will be reduced the most.

PHOTO SETTINGS
-
PHOTO TYPE >
SINGLE SHOT > Takes a single shot with each press of the shutter release button.
HDR – This will capture and combine an HDR image. The disadvantage is that you will not be able to access the original images and will be left with the automatically generated HDR image. I favour shooting a bracket and combining in photoshop.
BURST MODE – Shoots a burst of 3 or 5 images. This can be useful for Noise Stacking.
AEB – Is a bracketing mode that shoots a bracket of 3 or 5 images.
PANO – captures and combines images into various types of panorama image
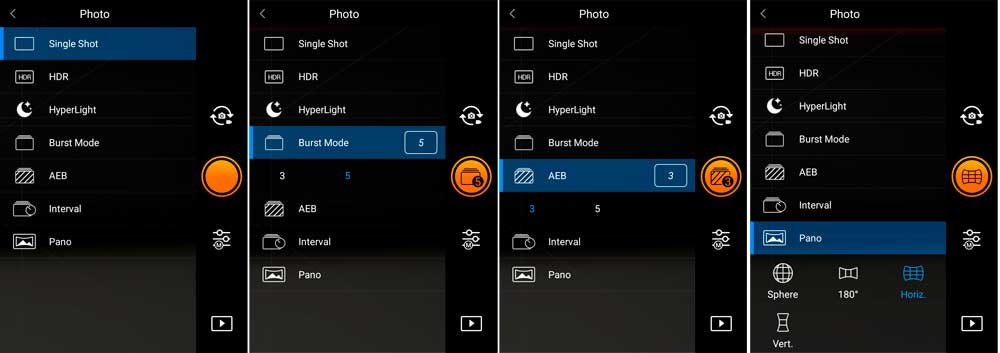
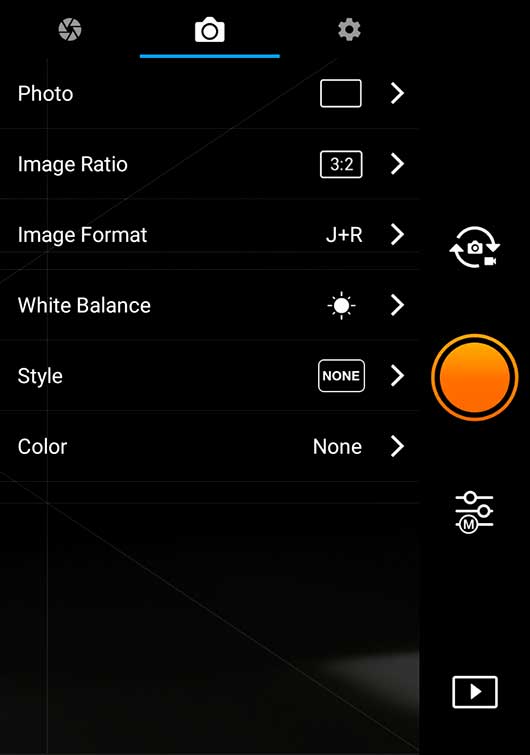
IMAGE RATIO > 3:2 – There is not much point in changing this to 16:9 as you can always crop to 16:9 after.
IMAGE FORMAT > J+R – I shoot with both RAW + Jpeg.
WHITE BALANCE > Daylight – I leave this set to daylight as this can be changed in post as I don’t fly the drone inside or where the predominate light source is fluorescent or tungsten etc.
STYLE > None
COLOUR > None
CAMERA SETTINGS
 SAVE ORIGINAL PANORAMA > RAW
HISTOGRAM > On – This can be useful to view as it can be seen on the full screen image camera display and can also be moved around the screen to a position that suits.
LOCK GIMBAL WHILE SHOOTING > on
AFC > off – This can be useful if left on and its use is down to how your preference.
AUTO SYNC HD PHOTOS > on
OVER EXPOSURE WARNING > on
HEAD LEDS AUTO TURN OFF > on
GRID > On – Useful for composing and precise positioning.
CENTER POINT > on
PEAKING THREASHOLD > Close
FORMAT SD CARD> This is definitely worth doing before flight and should be part of your pre flight checks.
2) EXPOSURE
Exposure is best set using manual mode using both the histogram and the exposure indicator scale. You may have to turn on the histogram in the settings. You can then position this graph anywhere you want on the screen.
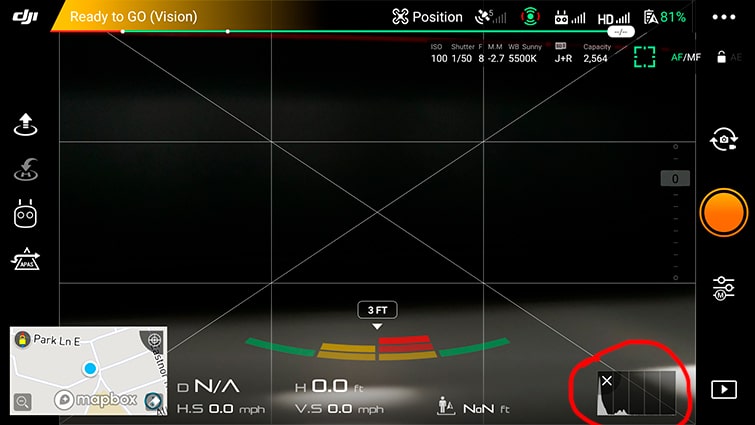
In general you want to aim for a balanced histogram graph without bunching on either side.
When using the exposure indicator scale you want to aim to have the dial at zero rather than at a +- number for the areas where you want to render as neutral in terms of tone.
If you would rather render those areas brighter adjust exposure until the scale reads a + number or a – number if you want to render details darker. This is where you can use your creative judgment to determine how a scene should look. On the histogram graph a darker image will show more bunching up on the left side of the graph, and more on the right for a brighter image.

I tend to under expose favouring highlights and bring back detail in the shadow areas in post. If you have a contrasty scene I’d suggest shooting a 5 stop bracket in AEB mode. This gives you the flexibility to choose the appropriate exposure in post or create an HDR image.
3) WIND SPEED
Fly in low wind speeds to avoid the drone moving too much. I’d recommend not flying in wind speeds greater than 10mph. The drone is rated to fly at about 20mph but image sharpness may be effected at these speeds.
4) BEST LIGHT – BEST TIME OF DAY

Choose the right time of day and weather for the best light on your subject will make a big difference to your drone photography. Consider how shadows fall, the contrast and the colour temperature changes during the course of the day.
It’s often said aerial photographs are best taken in the middle of an overcast day. The thinking being that any shadows will be eliminated rendering low contrast. I would choose the time of day and or conditions which suit your subject and convey the tone or story you want.
I often find that I prefer the light in the evening or morning and when the sky is clear, the colour temperature is warmer and shadows longer. I like my subjects to have shape and contrast and atmosphere and so pre visual the photograph using google maps and an estimation of the sun position, I can then determine the best time of day to ensure that light is hitting the most important part of subject and that it is not in shade. Equally you may want a very graphic flat composition and so an overcast sky would be more beneficial or the middle of the day when the sun is directly overhead.
It can help to use apps like The Photographer’s Ephemeris to plan the best time of day relative to your position including height above ground and the suns position.
5) COMPOSITION
Use the Golden Ratio and rule of thirds. Keep horizon level, by making sure you Gimbal is aligned correctly. Unless you want the horizon to be at an angle of course. Use strong graphic elements, these could be repeating patterns, bold colours or simple juxtapositions of form. Turn on the grid lines in the camera settings.
Consider putting the Mavic into Tripod mode this will help for controlling the aircraft carefully allowing precise compositions to be made.
Consider the whole frame and try to reduce any elements which don’tadd anything to the picture or are distracting.
Higher isn’t always better and you may find that you can include interesting foreground elements or juxtapositions with a lower altitude.
6) NOISE STACKING:
Can help to reduce the effects of noise. The first step is to put the camera into Burst mode, shoot a burst of 5 images of the same scene. Then when in post
Select the 5 photos in Lightroom -> Right click -> Open as layers in Photoshop
-
- Select all the 5 layers in Photoshop -> Edit -> Auto Align. This will auto align the images incase the drone slightly moved during taking the images.
- Select all 5 layers -> right click -> Convert to smart object.
- Layer -> Smart Objects -> Stack mode -> Mean
7) PLAN, PRE VISUALISE AND SCOUT LOCATION ONLINE
Plan and pre visualise the drone task and photographs that you want take online. This can be done easily online without having to travel to the location in the first instance. And may save wasted energy travelling to a location only to discover that it is unsafe on private land or perhaps the wrong time of day etc. Online scouting and planning allows you to plan the flight path and flight area, check safety distances and will make your decision making more concise knowing what angles and or viewpoints you need to be imposition. Rather than spending time looking around without knowing what your objective is. Of course you may discover unplanned viewpoints that yield interring photographs.
An online site scout doesn’t replace an actual physical site visit and might be required especially if you are flying in an area that may be congested or where other safety concerns could prevent a safe flight.
Online scouting and pre vis tools include Google Maps, Bing Maps, Where’s the Path, Photographers Ephemeris and ViewRanger. ViewRanger and the Photographers Ephemeris are both available as mobile apps also.
Google Maps – Is great for pre vis using the 3d map and street view allowing you to take a virtual look around to check for access, viewpoints, hazards and possible safety and privacy concerns. You can save maps with points of interest which is useful if your planning to undertake many tasks.
Bing Maps – Is similar to Google accept that you can choose to view the Ordnance Survey overlay which allows for a another level of depth to your planning.
Where’s The Path – Places both a google map and Ordnance Survey map side by side with a pointer which moves simultaneously at the same point on both maps, this is very useful for checking access and ground features quickly and clearly. I have written a post specifically about using Where’s the path for photography.
ViewRanger – I use viewRanger primarily to plan routes and estimates walking distance and time. It’s also a great navigation aid. Enabling you to plot waypoints and navigate easily to them.
Photographers Ephemeris – Allows you to plan the sun movement throughout the day and therefore decide the best time of day to undertake your task.
I hope these Tips and Settings for getting great Photographs from the DJI Mavic Pro 2 drone are useful and please do comment if you think I have missed anything or you have any recommendations for improving drone photography!
References: DJI GO 4 Manual


Pingback: Photographers Have you ever wanted to find a footpath with Google maps? - London Corporate and Interiors Photographer // Alex Orrow Photography